Write Off
When an account![]() In the Cloud Monetisation Platform, a billing entity that can be used to manage payments on one or more subscriptions or payments for services. An account can hold details such as payments or invoices. has an unpaid balance, it enters into Credit Management to recoup this outstanding balance.
In the Cloud Monetisation Platform, a billing entity that can be used to manage payments on one or more subscriptions or payments for services. An account can hold details such as payments or invoices. has an unpaid balance, it enters into Credit Management to recoup this outstanding balance.
Once the account is in the final stage of the credit control procedure, the amount owed and the account can be written off. Writing off the account sets the balance and overdue amounts on the account to zero. The account type is moved to Written Off as part of the write off credit control procedure, and allows this transaction to be easily identified on the Account Summary screen in AgentView![]() The graphical user interface of the CMP that is typically used by Customer Service Agents to access CMP customer and billing data. In versions prior to CMP 8.0, this was called the CMP GUI..
The graphical user interface of the CMP that is typically used by Customer Service Agents to access CMP customer and billing data. In versions prior to CMP 8.0, this was called the CMP GUI..
You can also write off an individual invoice using the Write Off drop down option against the transaction.
Write Off Credit Control Process
To write off an account that has been through the credit control procedure, you can follow these steps when the account is in the write off stage:
-
Terminate the invoice
-
Process the Acc Move to Write event.
You can view the write off transaction on the Financials > Transactions Lower Panel.
Write Off Individual Invoice
If required, you can write it off from the Financials > Transactions Lower Panel using right-click on the invoice, and selecting Write Off from the drop down list. The outstanding invoice amount is set to zero, and the write off transaction shows in this panel.
Setup the Account Type Movement to Write off event
To process the Acc Move to Write event, you first need to add the account type, and then define the write off workflow event.
Add a Write Off account type
-
From the Business Configuration
 A module in the CMP Administation console that provides for viewing and modification of business and user applicable system configuration. console, select Credit Management > Account Types from the left-hand menu.
 The Account Type List page is displayed.
-
Add an account type using the Written Off usage
The consumption of services, for example a subscriber using call minutes. type. -
Select Save to save your changes.
Define the Write Off workflow event required
Defining the workflow event consists of three main steps:
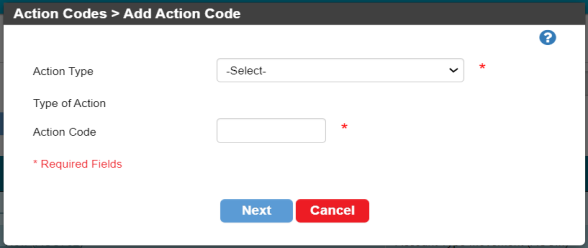
![]() 2. Creating the workflow event
2. Creating the workflow event
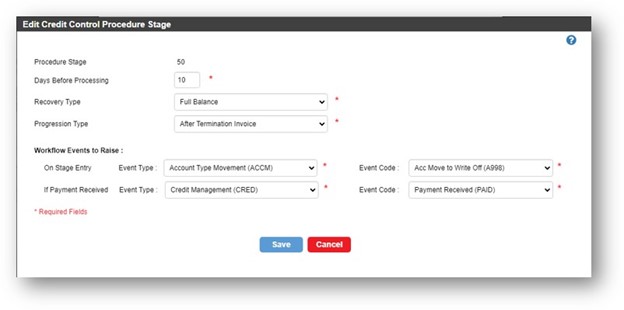
![]() 3. Adding the workflow event to the Credit Control Procedure stage
3. Adding the workflow event to the Credit Control Procedure stage